
A short guide to starting and growing your vegetable garden on a balcony. This guide includes links to where to buy all of the needed ingredients, online resources and tips. My own balcony garden in San Francisco, California, on the 3rd level above ground and is now 4 years old.
Table of Contents
- Location
- Planters
- Soil and Fertilizer
- Seeds
- Seedlings
- When and How to Plant
- Plants I like
- Drip Irrigation
Location

There's a great website that can help you visualize Sun's trajectory near your house: SunCalc. All you have to do is type your address and the website will show you Sun's trajectory today, and also on any other day in the year.

For example, in this image it shows where the Sun is now (it's about 2pm in January, the line with the orange circle), where the Sun was in the morning at 6:50am (orange line on the right), and where the Sun will set 5:24pm today (dark orange line on the left).
Use this information to position your planters for maximum Sun exposure, and to place shade-tolerant plants in places with more shade.
Planters

- They are well constructed with soft and durable plastic.
- They are BIG with a lot of surface area and, even more importantly, depth.
- They are inexpensive; you get a lot for $80.
- They have double-bottom for self-watering capabilities, so they maintain a more stable moisture level in the box (never seen it dry out).
- I like their height, easy to work with
- They look good!
- UPDATE April 2022: I am still happy with these planters. They feel like small raised beds and I have been growing massive tomato plants (3 in each) along with other veggies.
- UPDATE August 2023: still happy with the planters. Plus, I noticed a lot of earthworms in them (great sign!) which means they don't dry out, and earthworms fertilize the soil
- UPDATE March 2024: still love them. I stopped turning soil last year, so now have plenty of earthworms in them (yay!)

- Self-watering is really effective, i.e., a water reservoir to store excess water when it rains and to provide water when the weather is dry.
- Volume, the more, the better. More volume, more soil, more nutrients. In smaller volume planters, the soil gets too hot or too cold. In smaller containers, roots do not have enough space to grow.

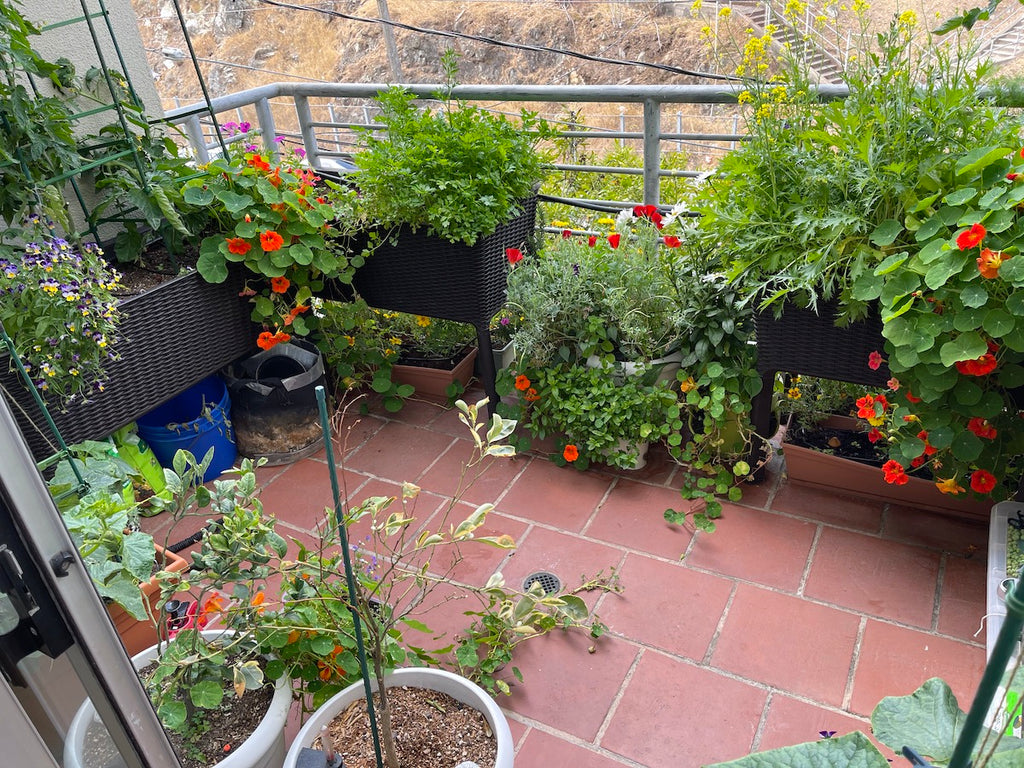
My balcony, March 2020 after a rain
Soil and Fertilizer

- Good, light soil with a lot of organic content (wood chips, I think).
- Inexpensive and easily available from Home Depot.
- It is not loaded with fertilizer like some others.
- UPDATE Jul 2020: based on my recent experience, their organic content will only be enough for a few months to fertilize your plants. Don’t forget to fertilize in 2-3 months, or your plants will suffer.
- UPDATE Jan 2021: I think this soil alone can get too heavy and compressed over time. This year, I am adding peat moss, perlite and a bit of compost to it.
- UPDATE Apr 2022: I decided to add Chicken manure to this soil. Plus I noticed that with peat moss in it, the soil really compacted in a year, so I have to add more.


- UPDATE Jan 2021: One additional soil fertilizer/additive I am introducing in 2021 is lime. Lime is meant to balance pH in the soil. For example, peat moss and compost will make it more acidic, so lime which is alkaline, will bring the pH back. Add lime to your soil mix early on, or sprinkle it on top of the soil.
- UPDATE Oct 2021: my tomatoes developed blossom end rot towards the end of the season, so I will be adding more Garden Lime sprinkled on top and dissolved in water. Garden Lime contains Calcium which is an antidote for blossom end rot.

Seeds
- Sprouts Farmers Market seed rack (usually by the entrance), Botanical Interests brand. Good experience so far, can’t complain.
- MIGardener.com (the owner has a petty cool YouTube Channel that I watch a lot). They have issues with inventory and are often sold out.
- Home Depot (I do not like them for some reason, probably the packets are too bright), Burpee?
- My mom (she gets hers from all sorts of places, including making her own)

Small part of my seed collection

Seeds rack at Sprouts Farmers Market in Daly City, CA
Seedlings


When and how to plant


- What months are best for planting (e.g Mar, Apr)
- Should it be started in seed trays or outside
- How to plant it
- What neighbors does it prefer and which it doesn’t (e.g., cucumbers don’t like tomatoes)

Plants I like
Leafy Greens for Salads:
- Swiss Chard. It has a better texture than kale in salads and just as nutritious. Plus, it’s super colorful AND it grows all season long. I now prefer it to kale
- Kale. It is hardy (survives droughts or over-watering). It grows fast. It is nutritious. It grows to relatively large plants. For salads, go for Red Russian Kale and Dinosaur varieties.
- Arugula. It grows fast. It tastes great. It’s nutritious.
- Lettuce. It grows fast. It produces a lot of volume.
- Mustard Greens. It is similar to kale but better tasting. Big plants, fast growing.
- Spinach. Nutritious, grows fast, medium volume though.
Herbs for taste and flavor:
- Dill. Tastes great and grows surprisingly fast under the right conditions, produces a lot of volume for an herb. Plant it in the winter.
- Cilantro. Tastes great, grows fast, not as much volume as dill, but still
- Parsley. You have to be patient with it, it takes a while to get going, but once it does, you’ll be adding parsley to all your dishes.
- Mint. I love black tea with mint, and mint grows super fast and produces a lot of volume. Remember to plant it in a separate container, otherwise, it will take over and will force other plants out.

Typical daily harvest
“Meaty” veggies:
- Radishes. Grow in 4-6 weeks, can seed close to each other, so produces a lot per row.
- Tomatoes. This is the first one that I have to wait for the harvest for a long time (4 months?), but its usually worth the wait. Usually, a hardy plant that grows very fast and indeterminate type varieties can be harvested for 5-6 months.
- Snap peas: great success in the winter months here in California.
- Cucumbers: mixed success so far with inconsistent watering (which they hate), so this year, I am putting a more consistent watering system in place. I will update you later in the year.
- Beets: trying them out this year for the first time.
Flowers for decoration and pollinators:
UPDATE Oct 2021: Over the years, I started growing more flowers. In my opinion they bring so many more insects to my garden and that's good overall. This year, I am growing Nasturtiums, Violas, Salvia, Marigolds and Petunias. I see bees in my garden every day now, as well as Hummingbirds. That can't be bad :)
- Nasturtium. Grows very well and quickly in my climate, great germination rates and doesn't need much care. I like it both for cute green and abundant leaves and for pretty yellow, orange, red flowers. For them to blossom all year long and stay healthy remember to prune them aggressively, and they'll grow right back and blossom.
- Petunia. Esp. Laura Bush variety. Love for the color and that they blossom all season long, hardy, drought-resistant, don't need much care (except deadheading once in a while)
- California Poppies. Native flowers and our State Flower. In my experience, not as hardy as the other two, especially in the first few months. Need to be watered properly and have enough space around them
- Johny Jump-up Viola. Super cute family of flowers, smaller and tender that fit in tight spots and self-seed. Mine died several times but like Phoenix their self-seeding brings them back
- Red Salvia. Hummingbirds love them, and I love watching hummingbirds


Drip Irrigation
In my 3rd year, I decided to add a drip-irrigation system to my garden for a number of reasons:
- It's just easier and takes less time to water my 14 planters with them. I just turn on the spigot in the morning for a few minutes and turn them off. And if you add a timer, you won't even need to do that
- Less deceases of all sorts. A lot of fungal deceases develop from overhead watering
- Develops better roots and more even watering
After researching a number of drop-irrigation kits, I finally decided to built my own. Unfortunately, I haven't found a way around it: you kind of have to design it to fit your specific garden, your layout, your planters, your veggies. And that means, pen and paper and drawing a diagram of how it will look.
I went with a company Drip Depot as they let you pick individual components, have every single thing imaginable and relatively inexpensive.
My list of parts is long. Yes, it takes time. Yes, it's all worth it in the end, considering how much time you save watering your plants every morning.
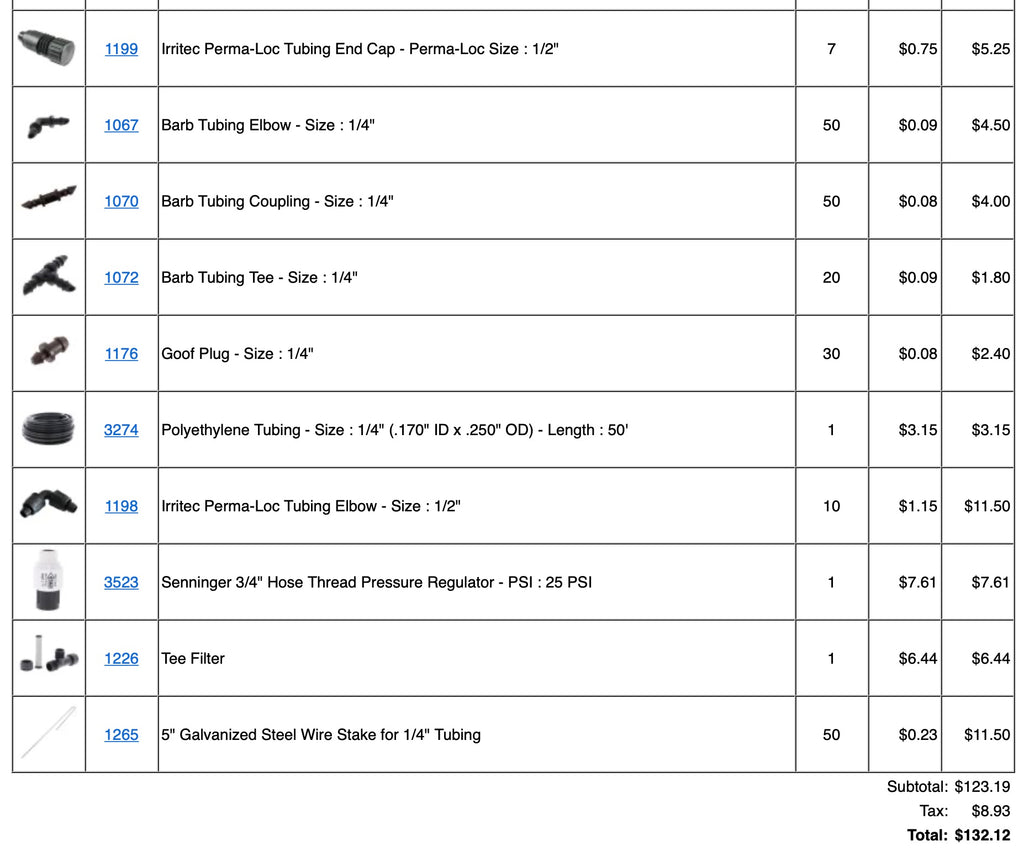
First set of parts:

and the second part:
There're roughly 3 parts to the entire system:
- Main plumbing
- Secondary plumbing
- Connection to the main water source
Main plumbing is your main hose, in my case 1/2'' that distributes water to each planter.

Main 1/2'' hose in two planters with an elbow/L connector

Another main hose line, placed inside the planters. A couple elbow connectors and an end plug.
Secondary plumbing are narrower tubes that distribute water within each planter. I went with 1/4'' drip lines with water emitters each 6''. These connect to main 1/2'' tubing. Think of how your body distributes blood, main arteries and narrower capillaries.

1/4'' drip lines connected to 1/2'' hose with aluminum stakes

Barb tubing coupling for 1/4'' drip lines and main 1/2'' hose
You might also need regular 1/4'' tubing that doesn't drip water but just distributes it.

Regular 1/4'' tubing (no emitters) which then connects to drip lines with "L" connectors
Then you need a set of "T" and "L" connectors for 1/2'' and 1/4'' tubing and drip lines, endcaps for both 1/2'' and 1/4'', and a few valves in case if you want to turn off watering some sections of your garden.
Finally, all of this is connected to your main water source. This one requires a few parts:
- Hose Vacuum Breaker
- Tee water filter
- Pressure Regulator
- Timer (optional)

Plan to have a few days to put it all together. Have a bucket of hot water handy so that you dip vinyl tubing in it first before inserting plastic connectors (your fingers will thank you) and go slow. This is a really fun high-school science project :). Trust me, you'll be super happy and proud to see it all working :)
Happy Gardening!

 This guide was written by Max Khusid. In his spare from gardening time, Max runs a small art gallery in San Francisco.
Max's mission with Art House SF is to introduce more people to the amazing world of art. I hope more people can have original, beautiful, eclectic artwork in the house.
Check out the rest of my website and maybe you can find a special art piece that will make your home even happier.
Thanks,
Max Khusid


Hi, thank you for the resources provided and the links. They were super helpful!
This was a wonderful guide. Thank you for the updates!
Thank you for your wonderful site and information.
Has anyone done a calculation to see if growing poppies and collecting the resin for local sale and using the cash to buy organic food would produce a higher yeild of nutrition for the equipment and time necessary?
joh
Leave a comment